Sunday, April 7, 2013

Craft Time Part Two

After the dresser, I decided to tackle a headboard since my large bed has never had one. I found this great link on how to make an upholstered headboard and picked out a colorful print at Walmart of all places.

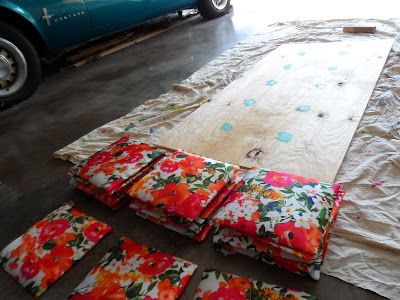
I don't have pictures of the first step, but what I did was use masonite board for the base and cut it into eighteen 10x10 inch squares. I also had extras cut since the guy at Lowes wasn't too concise with his measurements. The fabric was cut into about 14x14 inch squares as well and I used stuffing and quilt batting that my mom had leftover from a previous project to fluffy up my squares.

When cutting the batting, make sure to make it just large enough to wrap around the edges, or else you may have problems stapling through it latter. Once everything was cut out, I attached the fabric with a staple gun. This was the hardest part for me because the staples did not go through the masonite board well. If I were to redo this project, I would choose a softer board like pine as my base. Start by stapling one side and then do the opposite side and pull tight! If there is extra batting in the corners simply cut it off and then fold in the fabric to staple down.

In lue of photographs, here as some horrible drawings for reference.


The next step is to adhere the squares to a larger board. I bought a cheap board from Home Depot and had it cut down slightly smaller than the final size in the store. Lay out the squares to figure out which ones line up best (some may not be straight or the same size thanks to Lowes guy mentioned above :P). Once the final layout is decided, I marked the corners with a pencil and used some paint to cover up any wood that was showing though. 


To attache the squares, I used liquid nails (two tubes). Lay out a towel to keep the fabric clean and squeeze a generous amount on the back of the board. Press the square down well. I also used the leftover liquid nails to redo any squares that were not sticking. Don't worry if they move around a bit when touched, though, cause it takes a while for the nails to dry. I left mine out for a few hours before moving it. Also, it will smell for a few days, so I would recommend waiting to hang it up if you don't want to smell the sweet smell of fumes while sleeping. 


Now to hang! I used flush mount hanger like the ones found here to keep my headboard sturdy and close to the wall. Attach the hangers to the board and then install the wall mounts based on the board mount measurements. Be sure to measure from the outside edge and not the inside board in case the squares are not attached completely straight. Otherwise you will end up with lots of holes in your wall like me, haha. Chalk lines are also nifty for leveling. 


The final product should look something like this! Omg so beautiful like wow.


My next project will be shelves for my mini art collection :)


Craft Time

Since moving back to Wichita Falls, I have been working on a few crafty projects to update my bedroom. Up until now I was still using the same furniture I got when I was five! No more "big girl furniture" now. My first project was a wooden dresser that I found at an estate sale for ten dollars. With a little cleaning and fresh paint is went from spider home to bright decor! I should probably note here that I tend to enjoy crazy colors. It's the artists in me.


Thursday, December 20, 2012

Cutey Connor

This Christmas break sure has flown by with all of the preparation for starting my internship at the Wichita Falls Museum of Art in January. But I still had time to do one pet commission for a good friend! Connor was fun to draw, even if his fur that went every direction was a little tricky. I hope to have a few more commissions after the holidays and can't wait to start working full time at the museum.


Thursday, November 8, 2012

Design Time

I have been taping into my graphic designer lately and thought I would share some of it. For my resume, I created a personal logo because I thought it would help me stand out when applying for internships in art museums. Then I had the opportunity to design the MHSA shirt logo, which is based of the traditional museum temple sign design. And finally I made some business cards for my Best Friends Portraits mini business. It was nice to be creative in the middle of all the papers and tests!


Guns up!

I was never a big football fan, that is, until I came to Tech. This season has been tons of fun and I will miss it. Guns up! 


Winner!

Remember that National Arts Program exhibition? Well I won first place in the intermediate section! Thank you Garden and Arts Center for paying off this college student's credit card with a $300 cash prize :D


The Lucky Quarter

As well as the forest piece, I am entering another exhibition at the Buddy Holly center in Lubbock for Día de los Muertos. This small painting is dedicated to my uncle that passed a few years ago. It was a difficult time for me because I was nearing the end of my undergrad and needed to decide what I wanted to do after graduation. I had been battling between going for an MFA or apply to Texas Tech for the Museum Studies program, a completely new career path. In traditional BriAnna format I flipped a coin and it landed heads for Tech six times. I felt like my uncle, who I always looked to for advice, was pointing me in the right direction. That is why the eyes are quarters and the butterflies in the hat are for soul and change. I am very pleased with this piece and all of the other artists that contributed to a wonderful exhibition.