Sunday, April 7, 2013

Craft Time Part Two

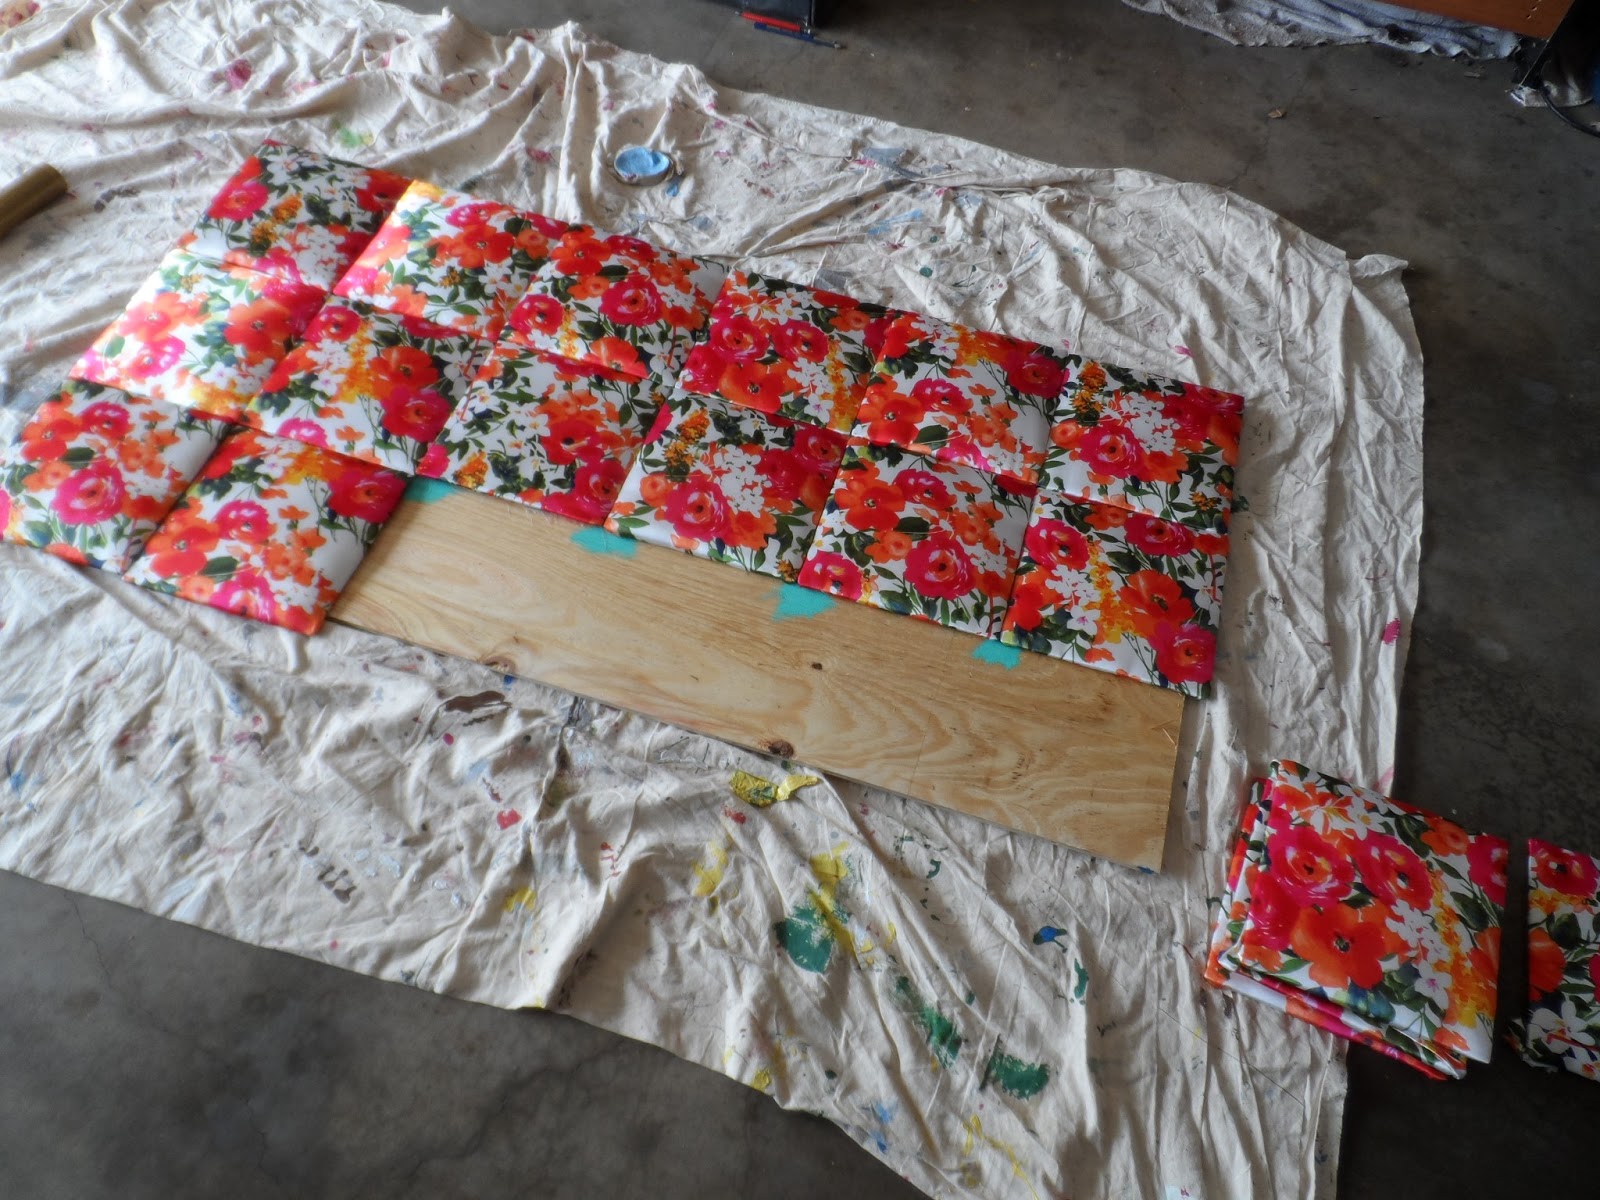
After the dresser, I decided to tackle a headboard since my large bed has never had one. I found this great link on how to make an upholstered headboard and picked out a colorful print at Walmart of all places.

I don't have pictures of the first step, but what I did was use masonite board for the base and cut it into eighteen 10x10 inch squares. I also had extras cut since the guy at Lowes wasn't too concise with his measurements. The fabric was cut into about 14x14 inch squares as well and I used stuffing and quilt batting that my mom had leftover from a previous project to fluffy up my squares.

When cutting the batting, make sure to make it just large enough to wrap around the edges, or else you may have problems stapling through it latter. Once everything was cut out, I attached the fabric with a staple gun. This was the hardest part for me because the staples did not go through the masonite board well. If I were to redo this project, I would choose a softer board like pine as my base. Start by stapling one side and then do the opposite side and pull tight! If there is extra batting in the corners simply cut it off and then fold in the fabric to staple down.

In lue of photographs, here as some horrible drawings for reference.


The next step is to adhere the squares to a larger board. I bought a cheap board from Home Depot and had it cut down slightly smaller than the final size in the store. Lay out the squares to figure out which ones line up best (some may not be straight or the same size thanks to Lowes guy mentioned above :P). Once the final layout is decided, I marked the corners with a pencil and used some paint to cover up any wood that was showing though. 


To attache the squares, I used liquid nails (two tubes). Lay out a towel to keep the fabric clean and squeeze a generous amount on the back of the board. Press the square down well. I also used the leftover liquid nails to redo any squares that were not sticking. Don't worry if they move around a bit when touched, though, cause it takes a while for the nails to dry. I left mine out for a few hours before moving it. Also, it will smell for a few days, so I would recommend waiting to hang it up if you don't want to smell the sweet smell of fumes while sleeping. 


Now to hang! I used flush mount hanger like the ones found here to keep my headboard sturdy and close to the wall. Attach the hangers to the board and then install the wall mounts based on the board mount measurements. Be sure to measure from the outside edge and not the inside board in case the squares are not attached completely straight. Otherwise you will end up with lots of holes in your wall like me, haha. Chalk lines are also nifty for leveling. 


The final product should look something like this! Omg so beautiful like wow.


My next project will be shelves for my mini art collection :)


Craft Time

Since moving back to Wichita Falls, I have been working on a few crafty projects to update my bedroom. Up until now I was still using the same furniture I got when I was five! No more "big girl furniture" now. My first project was a wooden dresser that I found at an estate sale for ten dollars. With a little cleaning and fresh paint is went from spider home to bright decor! I should probably note here that I tend to enjoy crazy colors. It's the artists in me.


Thursday, December 20, 2012

Cutey Connor

This Christmas break sure has flown by with all of the preparation for starting my internship at the Wichita Falls Museum of Art in January. But I still had time to do one pet commission for a good friend! Connor was fun to draw, even if his fur that went every direction was a little tricky. I hope to have a few more commissions after the holidays and can't wait to start working full time at the museum.


Thursday, November 8, 2012

Design Time

I have been taping into my graphic designer lately and thought I would share some of it. For my resume, I created a personal logo because I thought it would help me stand out when applying for internships in art museums. Then I had the opportunity to design the MHSA shirt logo, which is based of the traditional museum temple sign design. And finally I made some business cards for my Best Friends Portraits mini business. It was nice to be creative in the middle of all the papers and tests!


Guns up!

I was never a big football fan, that is, until I came to Tech. This season has been tons of fun and I will miss it. Guns up! 


Winner!

Remember that National Arts Program exhibition? Well I won first place in the intermediate section! Thank you Garden and Arts Center for paying off this college student's credit card with a $300 cash prize :D


The Lucky Quarter

As well as the forest piece, I am entering another exhibition at the Buddy Holly center in Lubbock for Día de los Muertos. This small painting is dedicated to my uncle that passed a few years ago. It was a difficult time for me because I was nearing the end of my undergrad and needed to decide what I wanted to do after graduation. I had been battling between going for an MFA or apply to Texas Tech for the Museum Studies program, a completely new career path. In traditional BriAnna format I flipped a coin and it landed heads for Tech six times. I felt like my uncle, who I always looked to for advice, was pointing me in the right direction. That is why the eyes are quarters and the butterflies in the hat are for soul and change. I am very pleased with this piece and all of the other artists that contributed to a wonderful exhibition. 

Final Forest Dream

I missed some progress shots, but the forest dream painting is now complete! If it had not been for a local art show it may have never been finished, ha. I am very pleased with how it came out and will be entering it in the National Arts Program exhibit at the Lubbock Garden and Arts Center. 

I debated for a while whether or not to add the falling figure, but I think it makes the painting now. The figure is cut out of mat board, mounted on foam core to create a shadow, and then attached to the panel frame with nails so that it can be taken off if needed. The colors are much darker than I normally work, creating the night and glowing feel. Now I would like to start a new painting that steps away from my usual dream theme. All that I need now is inspiration!


Digital Art

Painting from home has been difficult with lack of space and money since starting grad school. But that just means that I need to try out other ways of making art! So I decided to give digital art a shot. At first I tried manipulating photos to create dreamscapes as seen in the first two images below. Then I found this amazing tutorial from illustrator Teagan White on painting print-like drawings in Photoshop and had a lot of fun recreating an image that previously failed in real print form. I hope to give this another try after this semester over.

Tutorial link: http://teaganwhite.deviantart.com/gallery/?catpath=/&offset=24#/d4nhyl7


Wednesday, August 22, 2012

Forest Update

After deciding my new colors, I put down the next layer of color. Once I was happy with the color it was time to start adding shadows. Now it is looking more like a forest :)


Painting in Photoshop

While working on my painting, I decided that I wasn't feeling the colors. So instead of painting on in until I figured out what I wanted, using a bunch of expensive paint in the process, I used Photoshop. So I though that I would share this interesting process image!

Sunday, July 29, 2012


The Son of Lolcat (french: Le Fils de l'Lolcat) by Matt McCray

There is an website I like to follow called Woot.com. They have great deals on random items, but my favorite thing is the $12 shirts with often hilarious and cute designs. Every now and then they have contests for images and this week's was the internet through art history. Although this design did not win it deserves a shirt! Lol cats and Rene Magritte make for excellent art.

Glowing Forest

The forest dream painting is coming together well now that I have a goal to enter it in the National Arts Program exhibit at the Lubbock Garden and Arts Center in October. So here is what I have done so far!

The first step in my work is to lay down overall color in acrylic to get an idea of what I want. 


I have been working on this for a few sittings now so I have a few more process shots. After laying the color glaze in acrylic, I use oil paint to create a solid foundation to build on. Once that dries the glazing process can begin. I like to thin the oil paint to a transparent consistency and then overlay the colors. This creates a very soft blend that seems to glow after multiple layers. It also decreases the drying time, which with oils can be pretty long.


To incorporate the dreamer in the piece, I have decided to try something different and float a cut-out figure over the piece to look as if the sleeper is falling through the dream. I used mat board and an exacto blade to cut out the shape and then applied gesso to both sides to stabilize it.


Sunday, July 22, 2012

Dream Sketch

This blog was originally created as an assignment in a computers for artists class, but I have decided to pick it back up! The initial use as a process journal is a fun way to keep track of a piece, so that is what I will continue to do. Along with posting art related images, I may trow in an interesting museum story or two. 

To kick things off here is a scan of a sketch for my latest painting.  


For those unfamiliar with my work, I paint dreamscapes of my dreams. These night-time adventures are full of plots, characters, and settings and since I am a lucid dreamer I can recall them with vivid detail. In this particular dream the trees were able to communicate through touch. A caravan of strangers had gathered to sneak through the forest in order to escape those chasing them. The night was quiet and as I leaned on a tree to rest, it started to glow and warn me that someone was coming. Then chaos erupted as bulldozers trampled the forest flat in its search for the fleeing group. Soon after that I was knocked out in the dream and woke up in a hospital, which I have already painted the scene from here...


Pretty scary! But that is long dream story for another time. So along with art and museums, it looks like this may turn into a dream journal as well, haha.

Monday, November 29, 2010

Done!


All done!!! I like the way it came out in the end. Can't wait to see everyone elses tomorrow :)

Sunday, November 28, 2010

Almost Done


So I took out the top pink pixels because I though that they didn't fit in well anymore and there was already a lot going on. i think its just about done!

Tuesday, November 23, 2010

Pixelssssss


So here is my painting after the critique. I took out the victory flag pixels and replaced them with more square pixels. I also made it look as if the pixels are floating off in the wind. Does it look better now? I think so :)

Monday, November 22, 2010

Work in Progress


Here are a few things that I am working on. I like the way that it is looking so far but now I'm trying to decided on what to do with the hair. One has it outlined to make it more distinct and the other one does not and it flows into the painted hair better. Hmm.....


Thursday, November 18, 2010


So here is the painting with digital element started. I am using the pen tool in photoshop to create the hair and the transform tools. Next I want to add more hair and pixel squares and then figure out how to overlay them on the painting.

Tuesday, November 16, 2010

Finished Painting


So here is the finished painting! I scanned it into the computer and now it is time to add the digital elements. The hair is going to be transforming into strips of light and parts of the back will be breaking off into pixels... at least that's the plan. We'll see how it comes out :)